Reserve Study Preparation Checklist for HOAs and Managers

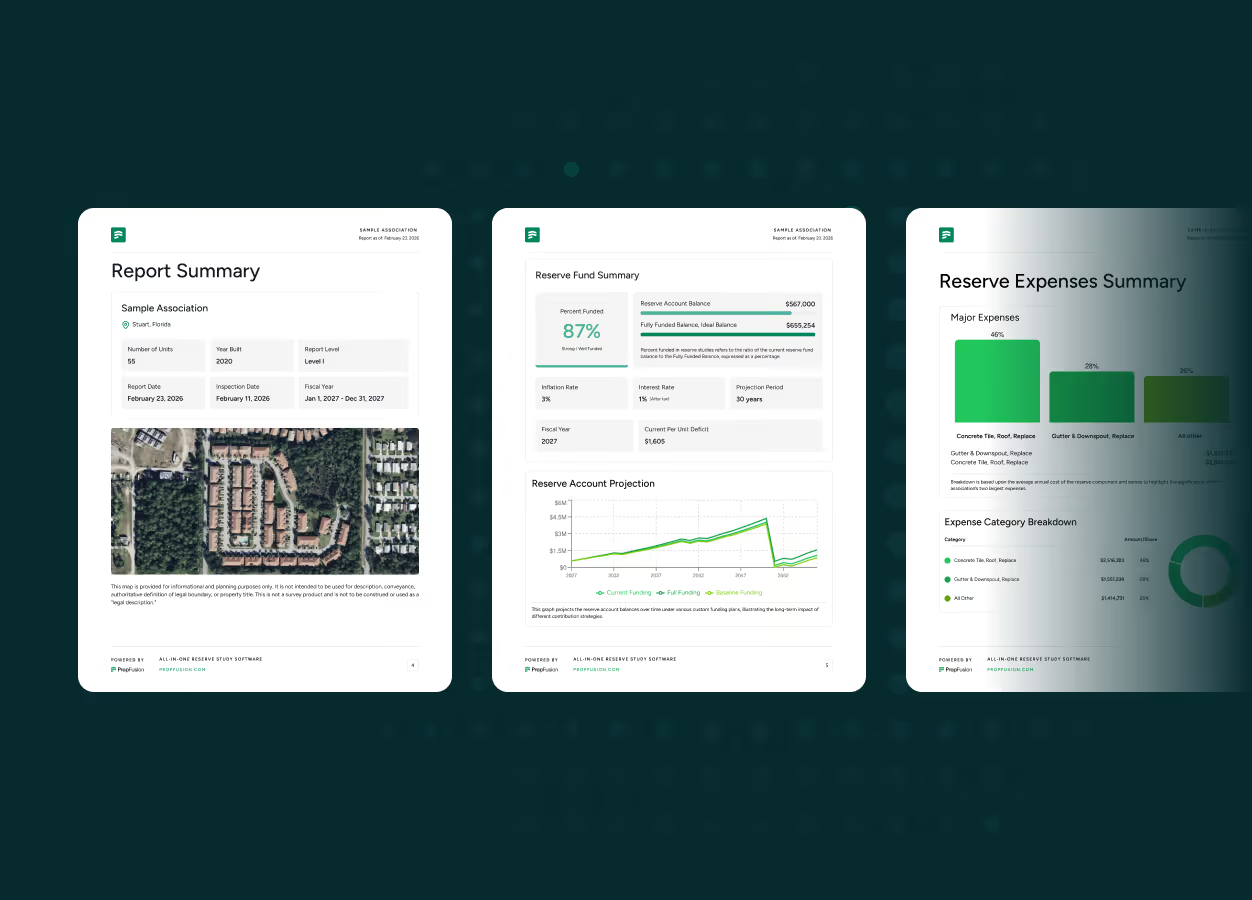
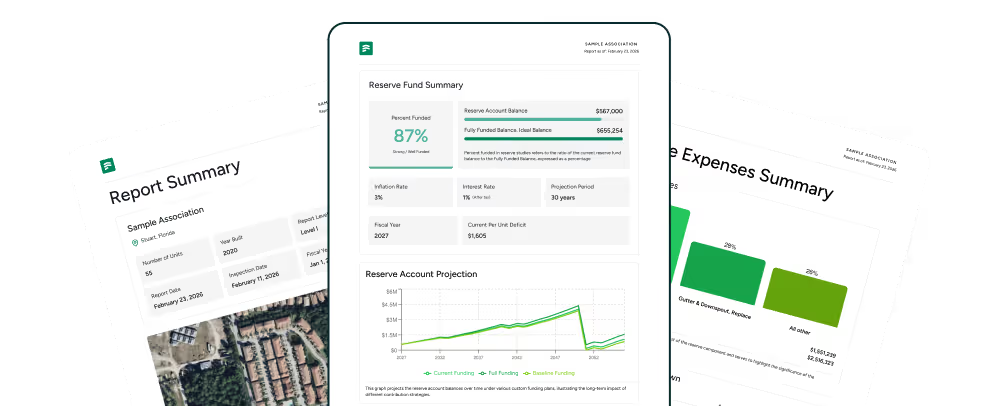
PropFusion delivers professional reserve studies with 30-year funding plans - powered by modern technology and backed by certified reserve analysts.
A reserve study is only as good as the information that goes into it.
If you hand your provider incomplete documents, vague project history and limited access to the property, you will end up paying for a report that is less accurate and less useful than it should be.
This preparation checklist is for:
- Community association managers
- Board members responsible for long term planning
It outlines what to prepare before the reserve study starts, what to organise for the site visit, and how to position your association to get the most value from the final report.
If you need a refresher on what a reserve study is and why it matters, start with HOA Reserve Study: The Complete Guide for Community Associations.
1. Confirm the type of reserve study you are ordering
Before you gather anything, be clear about what you are buying. Confirm with your provider:
- Is this a full baseline study with a comprehensive site visit
- An update with site visit that builds on a previous study
- An update without site visit that focuses on financials only
The level of service determines how much physical inspection will happen and what information the provider needs from you.
If you are unsure which level is appropriate, review The 3 Types of Reserve Studies (Levels I to III) first.
2. Gather core association documents
Your provider needs a clear picture of what the association is responsible for and how the property is configured. Assemble:
- Governing documents: CC&Rs, declarations, bylaws, plats or site plans
- Any maintenance responsibility charts that clarify what is common area vs unit owner
- Recorded amendments that affect responsibility for specific elements
- Current community map or site plan showing buildings, amenities and access points
This set tells the analyst which components belong on the reserve list and how the property is laid out.
3. Prepare financial information
The financial side of the study projects inflows and outflows over decades. Provide:
- Current year operating budget and reserve contribution line items
- Latest balance sheet or reserve account statement
- Last 3 to 5 years of financials showing reserve contributions and expenditures
- Details of any existing loans, repayment schedules and interest rates
- Information on any planned fee changes already approved by the board
This allows the provider to model realistic funding paths and compare them against your chosen funding objective. For a refresher on objectives, see HOA Reserve Funding: Full vs Threshold vs Baseline.
4. Collect past reports and project history
Your reserve professional does not need to rediscover everything from scratch. Put together:
- Previous reserve studies or funding analyses
- Engineering reports, structural assessments and inspection reports
- Capital project records: roofs, paving, siding, mechanical replacements, clubhouses, pools, major repairs
- Invoices and final costs for large projects in the last 5 to 10 years
- Active warranties and service contracts for key systems
This history gives hard data for remaining life and replacement cost estimates, rather than pure assumptions.
5. Create a current component and problem snapshot
Formal documents tell part of the story. The board and manager often know where the real issues are.
Ahead of the study, list:
- Visible problem areas: leaks, cracking, settlement, recurring failures
- Components that seem to be wearing out faster than expected
- Projects the board is already discussing for the next 3 to 5 years
- Any upcoming changes: new amenities, planned removals or major alterations
You do not need to diagnose the cause. Simply flagging these areas helps the provider pay closer attention during the site visit.
For help thinking through funding implications if problems are already visible, see Underfunded Reserves: Recovery Plans.
6. Plan site access and logistics
The site visit is where many studies lose time. Good preparation keeps it efficient.
Arrange:
- A single on site contact person who can accompany the inspector
- Access to roofs, mechanical rooms, crawl spaces, gates and locked common areas
- Keys, fobs and codes in one place
- A parking plan and any required vendor registration or security check in
- Basic safety information: restricted areas, known hazards, required PPE
Consider notifying owners ahead of time so they are not surprised to see someone inspecting the property.
If this is an update with site visit, provide a copy of the prior component list so the inspector can compare past assumptions to current conditions.
7. Coordinate with your manager, maintenance and vendors
The people who work on the property every day have valuable context that does not appear in documents.
Before the visit, ask your:
- Community manager to summarise recent maintenance issues and owner complaints that relate to common elements
- Maintenance staff to prepare notes on frequent repairs, problem zones and access quirks
- Key vendors (roofing, paving, mechanical) for any written assessments or life expectancy notes they have provided
You can either compile this into a short memo or arrange a short meeting between the reserve professional and your manager at the start of the site visit.
8. Clarify assumptions and expectations with your provider
To avoid misalignment later, have a short scoping conversation that covers:
- Desired analysis period (commonly 20 to 30 years)
- Whether you want multiple funding scenarios modeled
- Any known state law requirements that must be reflected in the study
- Your current funding objective, if any, and whether you are considering a change
If you are unsure about law requirements, refer to Reserve Study Requirements by State and confirm specifics with counsel where needed.
Ask your provider what they need from you by a specific date and in what format. A little clarity upfront saves many follow up emails.
9. Plan how you will use the finished study
Preparation includes thinking about what happens after the report arrives. Before the work even begins, decide:
- Who will review the draft report line by line for factual accuracy
- When the board will meet with the provider to go over findings
- How the board will translate recommendations into next year's budget
- How you will communicate key results to owners
Use How To Read and Use Your Reserve Study as a companion when you schedule that review meeting. It will help directors focus on the right charts and tables instead of getting lost in detail
10. Quick preparation checklist
As a final recap, before your reserve study starts, make sure you have:
- Confirmed the type of study and level of service
- Gathered governing documents and site plans
- Assembled recent financials and reserve account data
- Collected prior studies, engineering reports and major project records
- Created a short list of known issues and upcoming projects
- Organised physical access and a single site contact
- Collected input from your manager, maintenance staff and key vendors
- Clarified scope, assumptions and deadlines with the provider
- Agreed internally how you will review and use the finished report
With this groundwork in place, your reserve professional can focus on what they do best: analysing the property and building a clear, defensible long term plan.
Related Reading
- How Much Do HOA Reserve Studies Cost? — Know what to budget before requesting proposals.
- Underfunded Reserves: Recovery Plans for HOAs — What to do if your study reveals a funding gap.
- Florida Reserve Study Requirements — Florida SIRS law sets specific study and funding requirements.
- California Reserve Study Requirements — California mandates reserve studies every three years.
- New Jersey Reserve Study Requirements — New Jersey associations must maintain reserve studies under state law.
PropFusion delivers professional reserve studies with 30-year funding plans - powered by modern technology and backed by certified reserve analysts.
Take the guesswork out of your reserve study
PropFusion delivers professional reserve studies powered by industry-leading software. Request a proposal to get started.